Merchant Checkout Flow
As an overview, you will need to:
- Create a checkout via Velox Merchant API every time users want to checkout your products.
- Get the external checkout ID from the API response.
- Use the ID to get the checkout status & the payment URL.
- The value for
{baseUrl}issandbox-merchant.veloxwallet.comfor sandbox environment andmerchant.veloxwallet.comfor production environment.
Your user will need to scan the QR code using the Velox app and finish the payment.
1. Checkout Creation
Section titled “1. Checkout Creation”Use the following command to initiate a checkout:
curl https://{baseUrl}/api/merchant/checkout/create \ --request POST \ --header 'Content-Type: application/json' \ --header 'X-Velox-Merchant-API-Key: <your-velox-api-key-here>' \ --header 'X-Velox-Merchant-Secret: <your-velox-secret-here>' \ --data '{ "amount": "1000000", "metadata": {}}'- Replace
<your-velox-api-key-here>and<your-velox-secret-here>with your generated API Key & Secret respectively. - The amount is in 6 decimals, meaning that
1000000equals to ~$1,5678000equals to ~$5.678, and so on. - You can also put extra information you need inside the
metadatafield, e.g., the related internal checkout or product id.
If the request is successful, you will see the externalId field in the API response. The externalId is then used for generating a checkout link as follow : https://{baseUrl}?externalId=<externalId-here>. Users can scan the QR code displayed on that webpage using their Velox app or they can click the button to be redirected to the Velox app if it is installed.
2. Get Checkout Status
Section titled “2. Get Checkout Status”curl 'https://{baseUrl}/api/merchant/checkout/<externalId-here>' \ --header 'X-Velox-Merchant-API-Key: <your-velox-api-key-here>' \ --header 'X-Velox-Merchant-Secret: <your-velox-secret-here>'Replace the <externalId-here> with the value you get from step 1. If successful, you will see the checkout details like userUid, amount, metadata, link, etc.
You can either embed the link on your web/app that will redirect users to the Velox app if it is installed or you can GET the link without following redirection to get the target URL and convert the target URL to a QR code. Users can then scan this QR code using their Velox app and finish the checkout payment.
Your web/app can keep polling the checkout status with this API or you can integrate with Velox Merchant Webhook to be notified of new changes.
- When the checkout details have payment data included, it means a user has started the payment process.
- When all of the subpayments have status
done, you can consider the checkout process to be done.
If you want to experience checkout yourself, You can download the Velox app here for iOS : testflight and Android: apk.
- Use a different email address to register.
- Go to ‘Faucet’ on the merchant dashboard, input your velox app user id to get the test funds to proceed with the payment.
3. Sequence Diagram
Section titled “3. Sequence Diagram”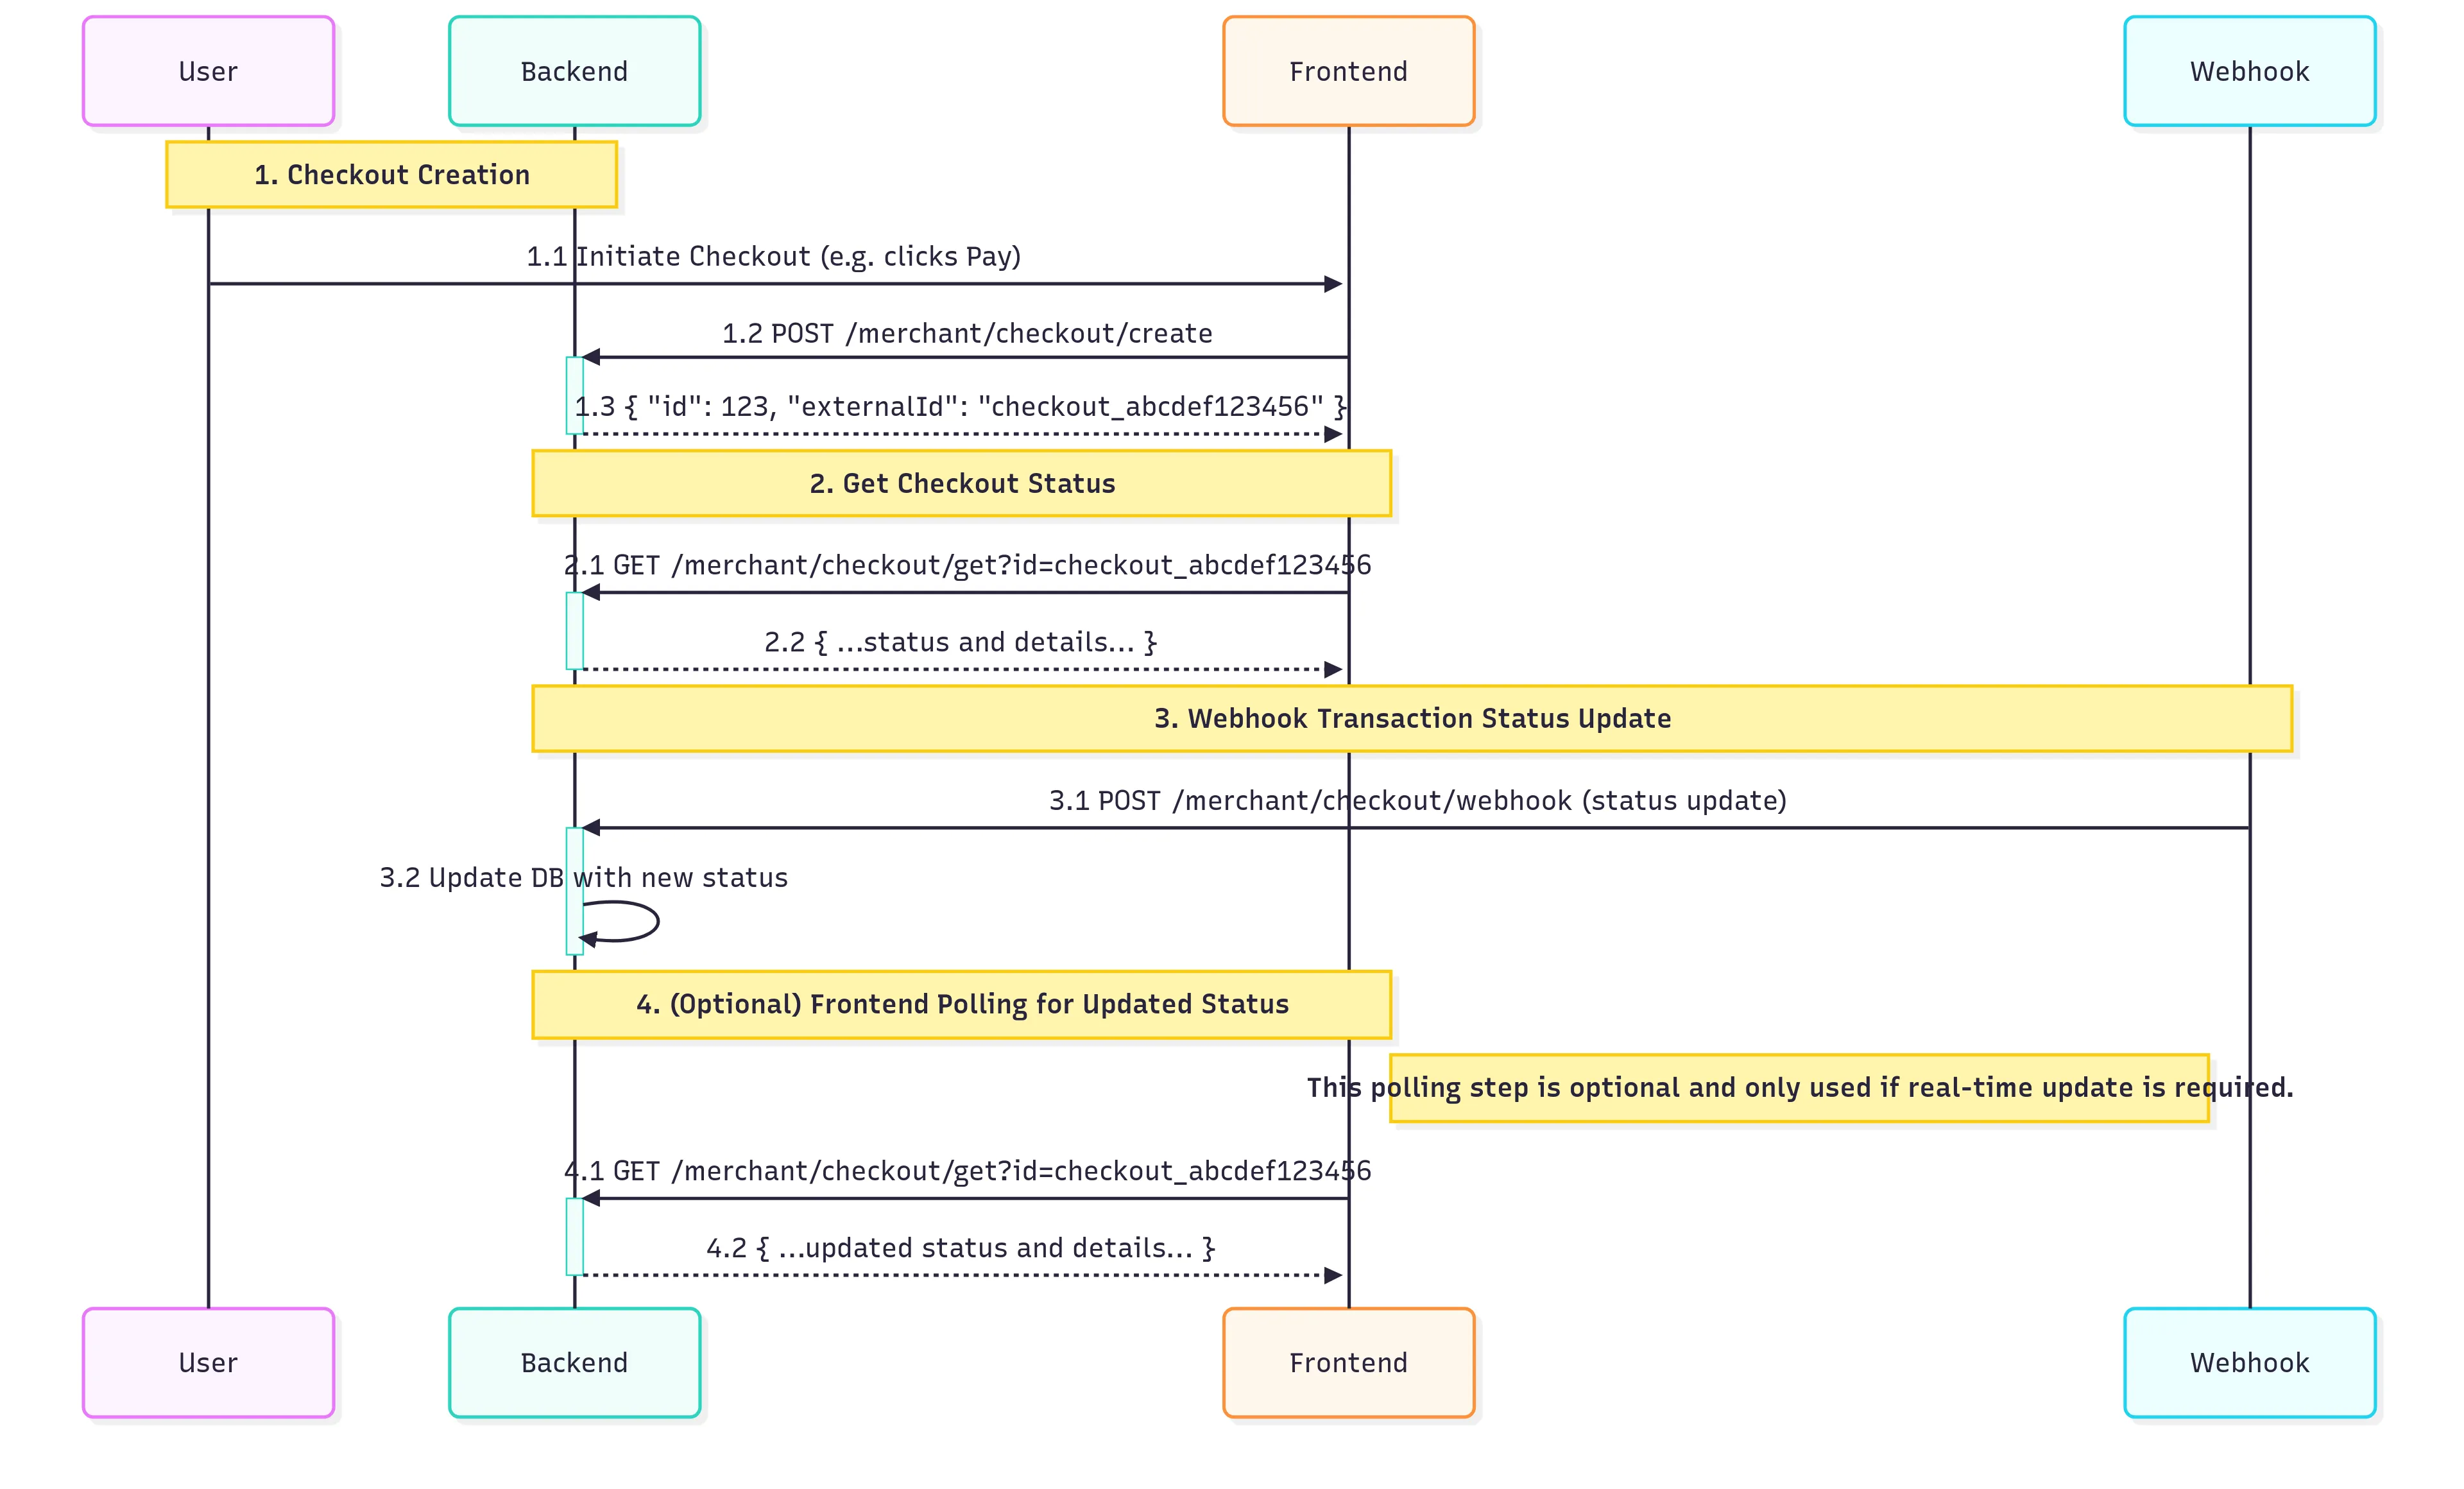
This diagram illustrates the merchant checkout flow with a step-by-step description and the expected API schemas for each step.
-
Checkout Creation
1.1 User initiates a checkout (e.g., by clicking “Pay” on the frontend).
1.2 The frontend sends a
POSTrequest to/merchant/checkout/createon the backend.1.3 Backend creates a new checkout entry and responds with the generated
idandexternalId. -
Get Checkout Status
2.1 The frontend polls (or queries) the backend with
GET /merchant/checkout/get?id=checkout_abcdef123456to retrieve the status and details of the checkout.2.2 Backend returns the status and details.
-
Webhook Transaction Status Update
3.1 The payment provider sends a webhook
POSTto/merchant/checkout/webhookwith the new status (e.g., completed, failed).3.2 Backend updates the checkout status in the database accordingly.
-
(Optional) Frontend Polling for Updated Status
4.1 The frontend may continue polling
/merchant/checkout/getto check for status changes after the webhook is processed.4.2 Backend responds with the updated status and details
{ "id": 9, "externalId": "k8O4SVRkbgxqyqW3SX9F"}4. API Schemas
Section titled “4. API Schemas”1. POST /merchant/checkout/create
Section titled “1. POST /merchant/checkout/create”Request Example:
{ "amount": "100.00", "metadata": { "orderId": "ORDER123" }}Response Example:
{ "id": 123, "externalId": "checkout_abcdef123456"}2. GET /merchant/checkout/get?id=checkout_abcdef123456
Section titled “2. GET /merchant/checkout/get?id=checkout_abcdef123456”Request:
Query parameter: id=checkout_abcdef123456
Response Example:
{ "id": 123, "userUid": "user_abc123", "createdTime": "2025-07-07T05:54:15.000Z", "amount": "100.00", "externalId": "checkout_abcdef123456", "metadata": { "orderId": "ORDER123" }, "paymentId": null, "payments": { "id": "pay_001", "createdTime": "2025-07-07T05:54:15.000Z", "totalAmount": "100.00", "txnFee": "1.00", "networkFee": "0.50", "discount": "0.00", "subPayments": [ { "status": "pending", "amount": "100.00", "chain": "ETH", "currency": "USDT", "withTxnFee": true, "networkFee": "0.50", "discount": "0.00" } ] }}3. POST /merchant/checkout/webhook
Section titled “3. POST /merchant/checkout/webhook”Request Example:
{ "externalId": "checkout_abcdef123456", "status": "completed"}Response:
HTTP 200 OK, usually empty or with a confirmation message.
For more details, visit our project repository for more information at:
https://github.com/MoonLabLtd/velox-checkout-example